Always wanted to try out neural synthesis without any single line of code, or any patching? In this article, let's see how to play with RAVE inside digital audio workstations (Live, Logic, FLStudio, Cubase...) with the RAVE VST.
Video Tutorial
Installation
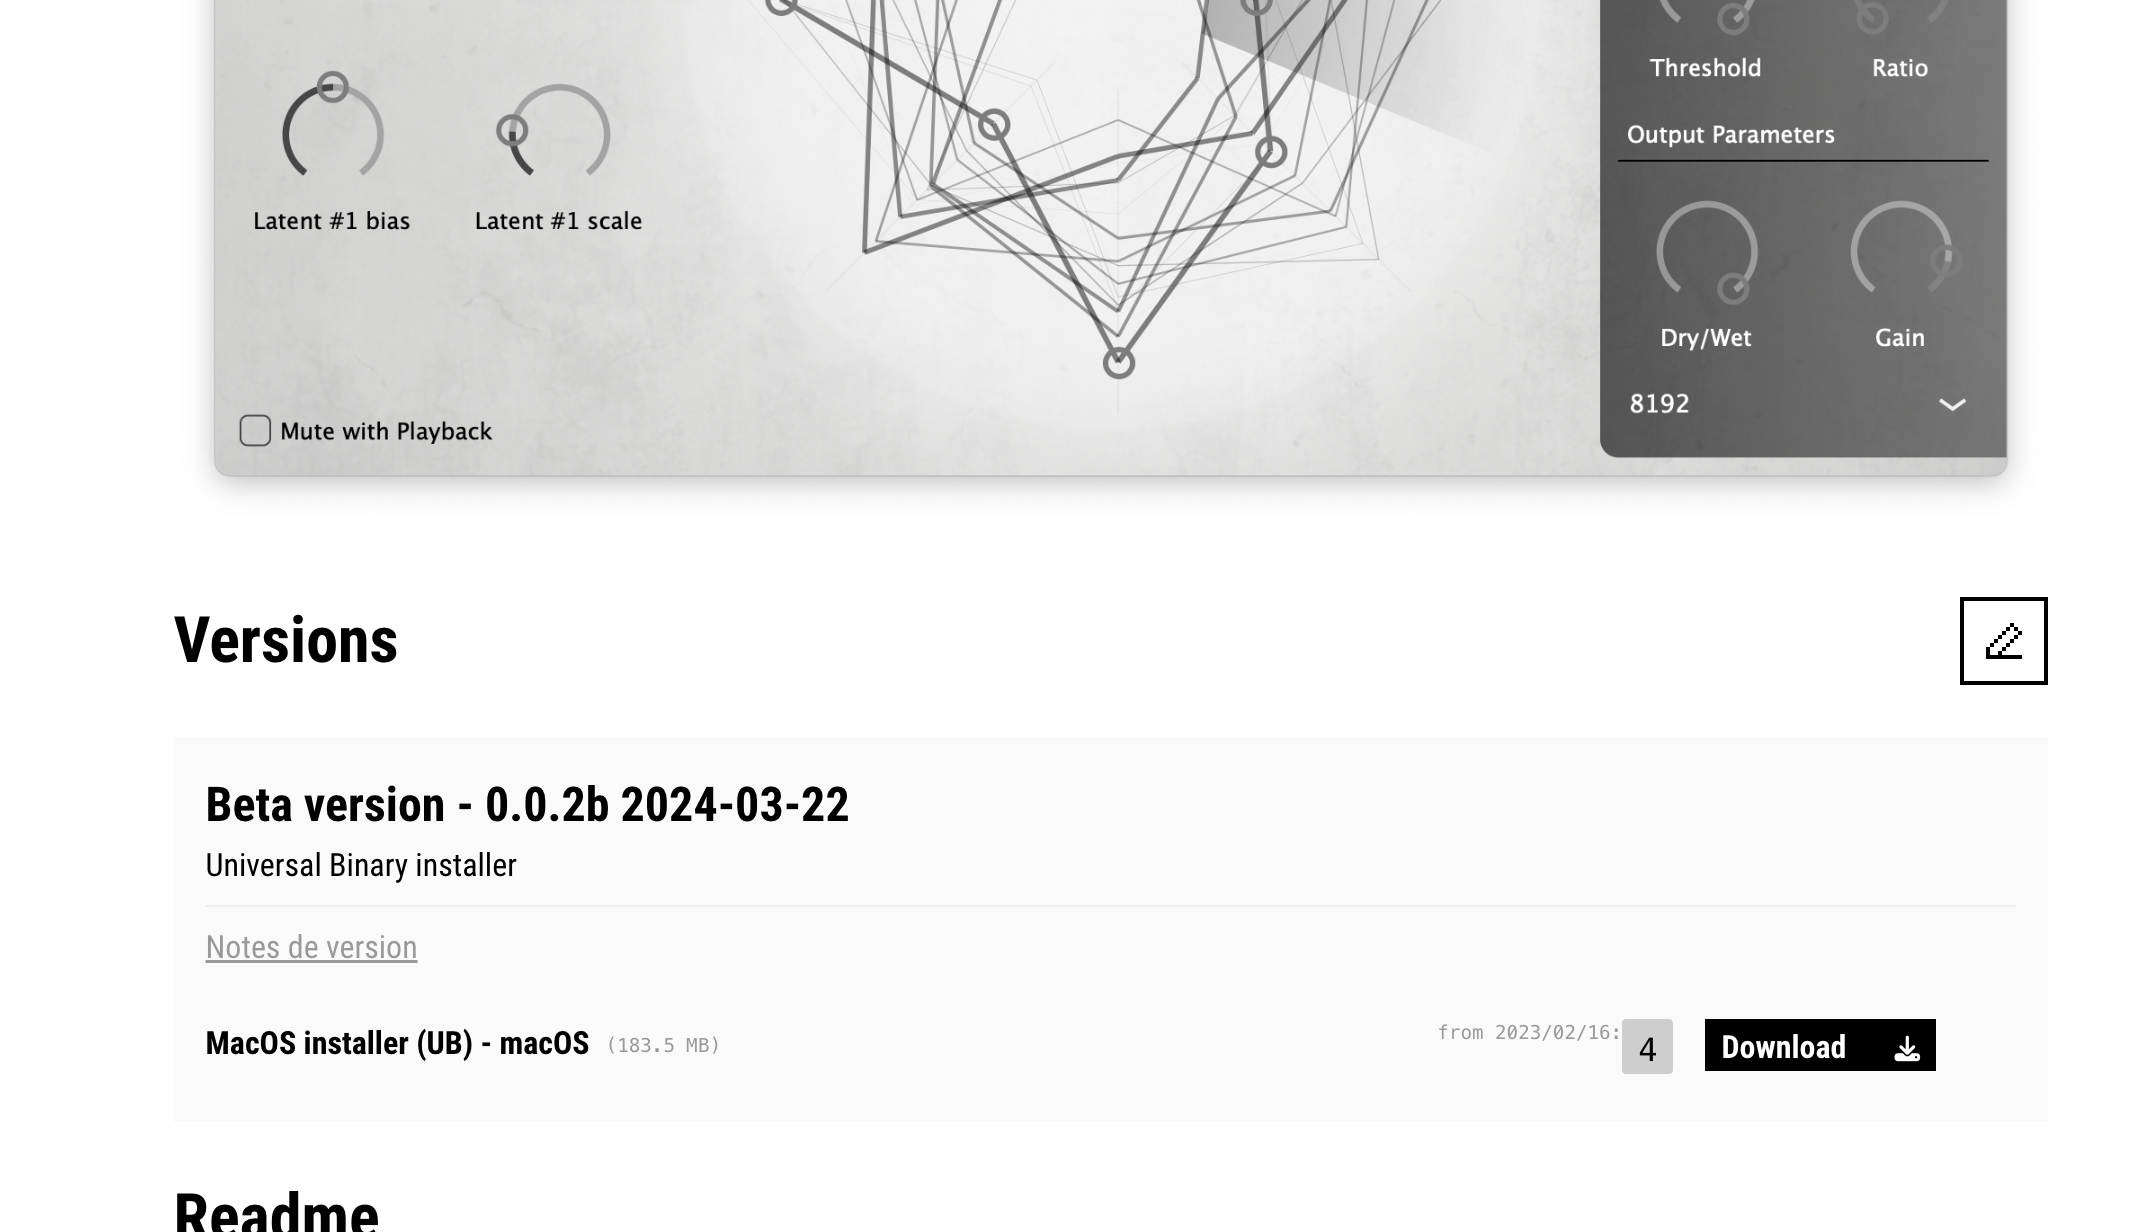
All you need to put neural synthesis into your favorite DAW is - the RAVE audio plug-in (image), and - a model (image), that has been previously trained on a given dataset. Don’t worry, you can download the IRCAM models directly inside the RAVE plug-in. To obtain the audio plug-in, please go to the RAVE VST Forum webpage and download the installer that corresponds your platform.

How does RAVE work?
RAVE is an auto-encoder, meaning that it takes sound as an input, generates sound as an output, and trained to reconstruct the incoming sounds of the dataset. This processing is based on two separate processes
- an encoding process, where a given window of incoming audio (let say 2048 samples) is transformed into a set a latent variables (128 parameters in general)
- and a decoding process, that inverts these 128 latent variables back into sound.
We can then describe the RAVE transformation process like this : RAVE translates incoming audio into a set of synthesis parameters, that are used to generate back the sound. As each model is trained on a limited sound of data (orchestral sounds, NASA sounds, ...), it will try to extract these parameters even if the input sound does not match the original database ; this is why RAVE can perform timbre transfer. By example : if RAVE has been trained on piano sounds, and is given a violin sound, it will try to extract synthesis parameters from it a generate it as a piano sound.
This is also why you can use RAVE as an audio effect by transforming incoming audio, but also as a synthesizer by directly controlling these latent synthesis parameters. As 128 dimensions is way too much to be controlled manually, they are usually reduced to eight dimensions, that you can manipulate inside the VST.
Playing with RAVE inside the DAW
Using RAVE as an effect
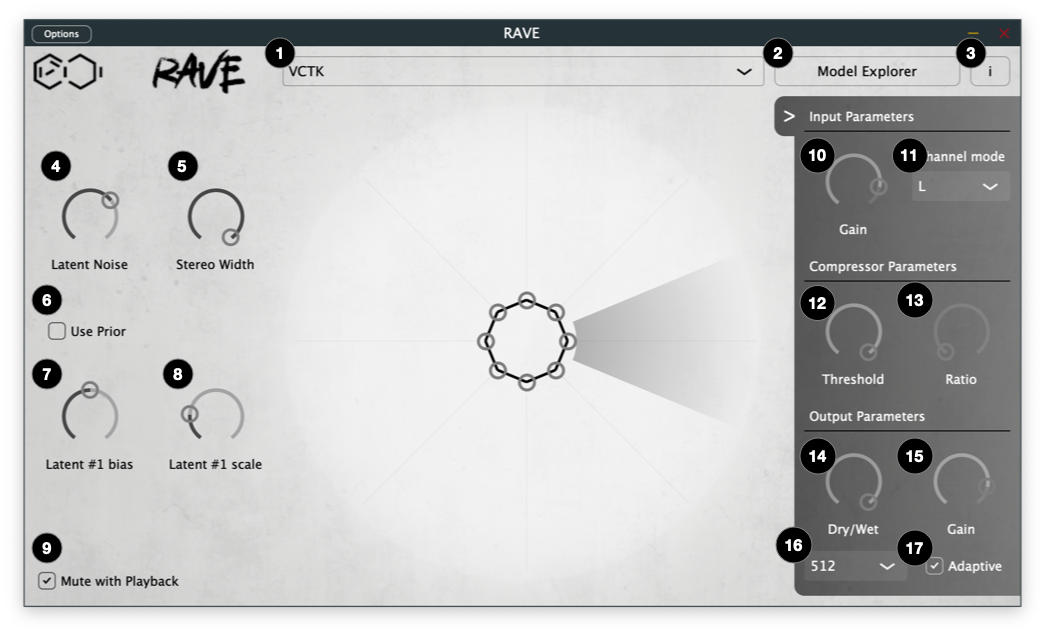
RAVE VST is an audio effect, as it can transform an audio input with a selected neural network. However, you can still use it as a synthesizer ; we will see that later. If you open the plug-in editor, you will see this interface :

- Model Selection Menu : where you select the playing RAVE model.
- Model Explorer : opens the interface to download model from the Forum website.
- Information : shows information about RAVE VST.
- Latent Noise : injects some noise in the latent variables of incoming audio
- Stereo Width : recreates stereo from mono models by randomizing some latents before decoding
- Use Prior : if available, use prior to generated latents
- Latent Bias : biases latents with a static value
- Latent Scale : scales incoming trajectory by a static factor
- Mute with Playback : cuts plug-in output when DAW is paused
- Gain : input gain of incoming audio before model transformation.
- Channel mode : if model is mono (all of them have so far), which channel to select for transformation : L, R, or (L+R)
- Threshold : compression threshold of audio before transformation
- Ratio : compression threshold of audio before transformation
- Dry/Wet : mixes model's output with dry signal
- Gain : overall output gain
- Latency : which buffer size to use for model transformation. Low buffer size means little latency, but higher CPU overload.
- Adaptive Latency : When set on, computes the processing time of the model to add it to overall latency. Toggling refreshes the latency computation.
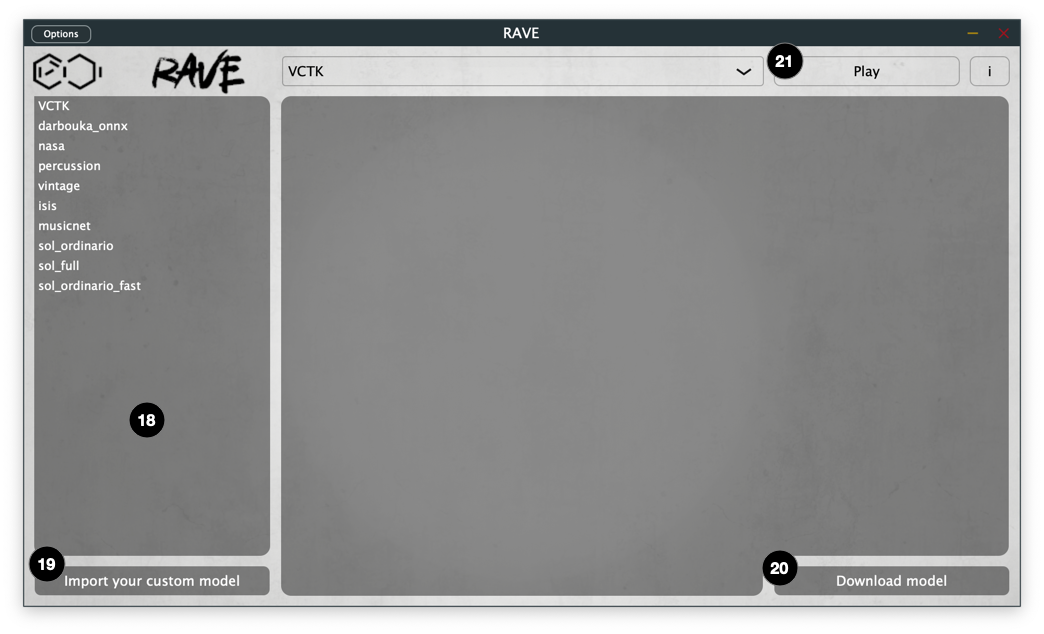
This may be a little complicated at a first glance, so let's make it work step by step. To make RAVE VST transform the sound, you first need to select a model in the Model Selection menu (1). If this is the first time you installed RAVE VST, you should have no model available ; if so, you will first have to click on the Model Explorer (2) to access the Model Explorer panel (screenshot below) select a model in the list at left (18), and then click the Download (20) button. You can also import a custom model using the Import your custom model button (19). Then, go back to main interface by clicking Play (21).

Well, that's it! Depending on the model you chose, the plug-in may be generate sound even if the track is empty ; this is because some models have not been trained on silence, so do not know how to reproduce it.
Adjusting input parameters
Input dynamics. The panel with buttons (10) - (17), that you can unfold by clicking the array on the very left of the plugin windows, is very important to calibrate how the effect will react to your sound, especially with dynamics. Indeed, by definition, RAVE is highly (very higly) non-linear, and then will have consequently different behaviour depending on input loudness. For this reason we added basic gain and compressors to allow you to deal with that directly in the plug-in interface. You can also select with channel to listen, as RAVE VST models are listening monophonic signals.
Buffer size. A very important parameter is the latency controls (16) & (17). RAVE models have an important latency, that cannot be reduced as the models need a certain amount of samples for transformation. You can adapt the buffer size with the Latency Mode menu (16). Buffer sizes have a direct impact on CPU consumption : a slow buffer size will offer a reduced latency, at the cost of an higher CPU cost, while a big buffer size will offer an increased latency, but lower CPU cost.
Adaptive latency.This latency is declared by the plug-in to offer latency compensation within the DAW, but is difficult to evaluate exactly. The Adaptive toggle (17) allows to also encompass the processing time of the model, timing the delay between the input and the output of a model. However, this timing must be really biased, depending on your CPU load ; so, do not hesitate to deactivate it, or to trigger the timer again by de- and re-activating it.
Using RAVE as a synthesizer
Even if RAVE is an audio effect plug-in, it may still be used as synthesizer, even if it does not take MIDI notes as inputs. Instead, you can modulate the inner latent parameters of the RAVE model, to make them totally insensitive, or hyper-sensitive, to the input.

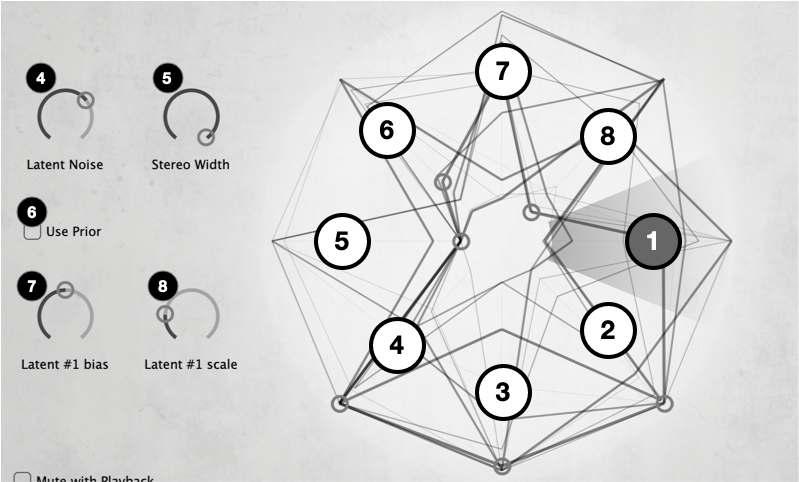
Playing with latent parameters. The kind of star with frenetic points depict the position of the first 8 latent synthesis parameters that the model infer from the incoming audio (or the prior, see below). Here, the 1st dimension is selected : you can see this by the Latent #1 labels under the two latent knobs at the bottom, and by the highlighted array on the circle. If you want to control another latent variable, click on the corresponding zone in the circle. The Latent #N bias (7) will add a constant value to the incoming latent value, while Latent #N scale (8) will multiply the incoming latent value by the given amount. Hence, by putting the scale to 0, you will be able to direcly control this latent synthesis parameter. Doing this to every dimension, you will use RAVE as a synthesizer ; et hop. The good thing though is that RAVE offers hybridation from a full-generator mode to a full audio-effect mode, so do not hesitate to explore all of these possibilities!
Latent Noise & Stereo Width. The two knobs (4) & (5) can be used for grouped latent parameters operations : Latent Noise will add noise to all the RAVE latent variables, performing some kind of latent glitch that will introduce more chaos in your model. The Stereo Width knob simulates a stereo output by randomizing some latent parameters (the one you do not access) between L & R outputs (we remind that RAVE VST models are processing mono signals!).
Prior mode. Some models are embedding a trained prior module, that can be summarized as a latent parameter generator. If such prior is provided, you can enable the prior mode by clicking (6) : if you do so, the decoder will not use the latent variables of the incoming sound, but the ones generated by the prior module. Latent knobs (7) & (8) are still effective, do not hesitate playing with it!
Well, that's it! Do not hesitate to ask your questions in the RAVE VST Forum.